

Labvanced is an online platform for creating and running studies with highly advanced experiment features. Labvanced users have access to a range of experimental logic features, the ability to create multi-participant studies, utilize web-based eye tracking, measure participants with millisecond precision, audio or video recording capabilities, and much more.
| Create an Account | Data & Reports |
| Change Password | Sharing Experiments |
| Getting Started | Training Link |
| Publish and Distribution | Support |
CREATE AN ACCOUNT
- Follow this link to create a free account in Labvanced: https://www.labvanced.com/page/registerpage
- Fill out the registration form using your CSU e-mail address
- You will receive an email asking to confirm your email address once your account has been created
- In order to upgrade your account to a licensed account, please complete the Account Request form found on this page.
CHANGE PASSWORD
- Select “My Account” in the left navigation
- In the setting section, there is a “Change Password” button
- You will be asked to type in your old password and then a new password
- Select “Change Password”
GETTING STARTED
Creating a Study
- Select “My Studies” from the left navigation panel.
- Here you can create a new study, import a study, or upload a study.
- When creating a new study, you must create a name, select a language, select allowed browsers, and select the task/frame setup. It is recommended to select the “Auto” option for new Labvanced users.
- Next, you will see your study design. In order to run a study, you must have at least one task, block, session, and group. In Study Design, users can add and organize the study sections.
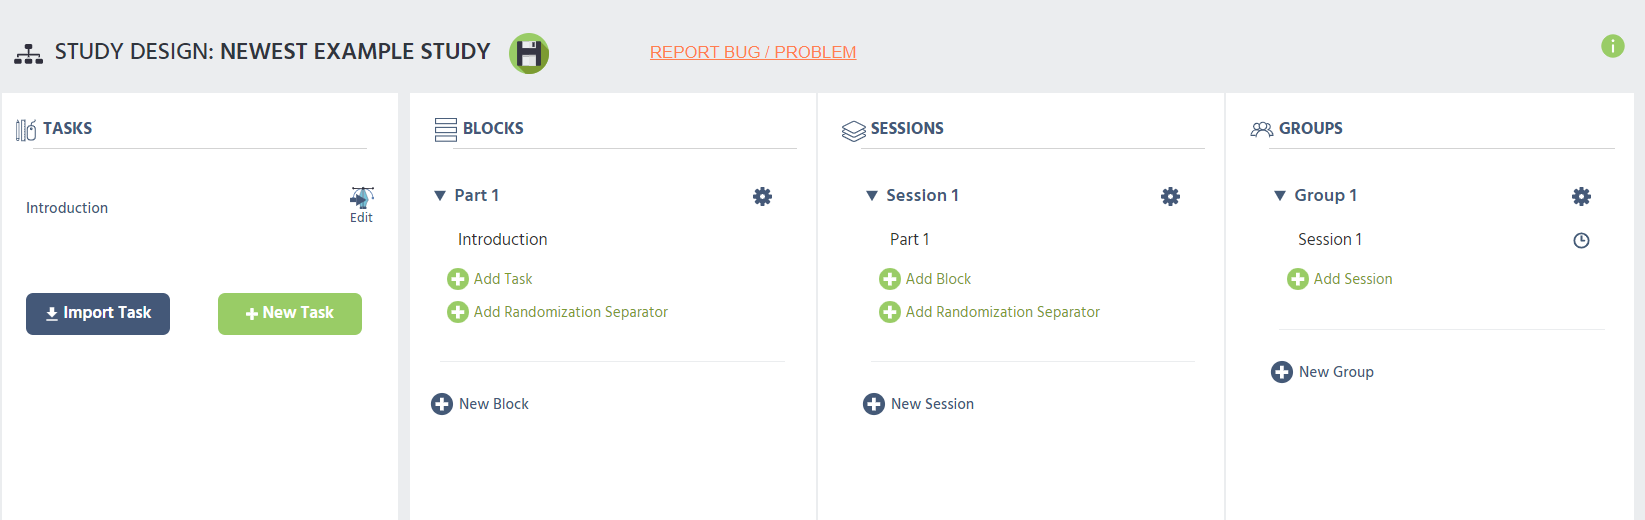
- Tasks are the smallest collection of frames that store the questions and stimuli of the study and can be added to multiple blocks.
- Blocks are used to group tasks together and allow the user to shuffle the order of the tasks.
- Sessions include one or more blocks and are assigned to groups.
- Groups consist of sessions and help the designer create different groups of participants.
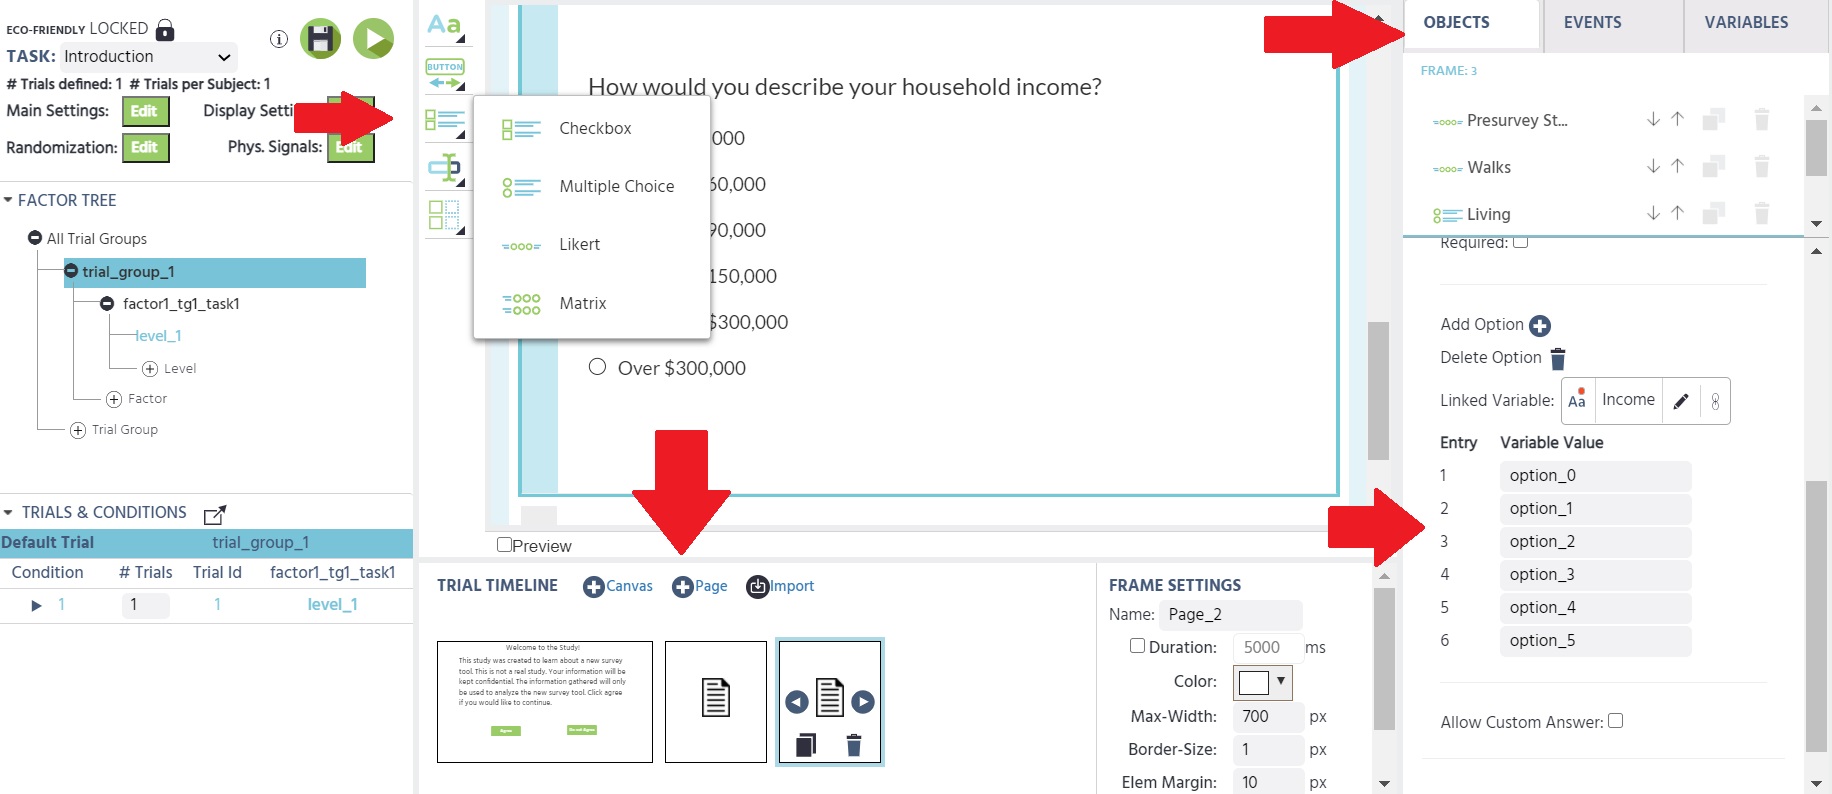
Task Editor
1. To enter edit mode for a task, select “Edit” next to the task name.
The Task Editor is shown below:

- The panel to the left of the slide or frame allows users to add pictures, texts, questions, and buttons.
- The play button allows the user to preview the entire task timeline.
- The Factor Tree and Trials & Conditions are used to present several repeated presentations of frames and create conditions.
- The Trial Timeline offers two formats for users, canvas and page, and allows for multiple frames to be added.
- Frame settings allow users to edit the appearance of the frame as well as set a timer.
- Object properties help users edit the current frame with more precision.
- Make sure to save changes before leaving Task Editor mode.
Creating Questions
- Click the + sign next to pages to add a page to your trial. The page format is recommended for questionnaires.
- Questions can be added by selecting options from the panel next to the frame. Users can create Description Boxes, Multiple Choice, Likert, Matrix, Input Boxes, and more.
- Users will name the question variable.
- While the question is selected or highlighted, users can add more answer options in the “Object Properties” section and rename variable names for the answers. The system will automatically name variables Option_0, Option_1, etc.
- Randomization and answer requirements are options available in the “Object Properties” section.
Adding an Image, Video, and Audio
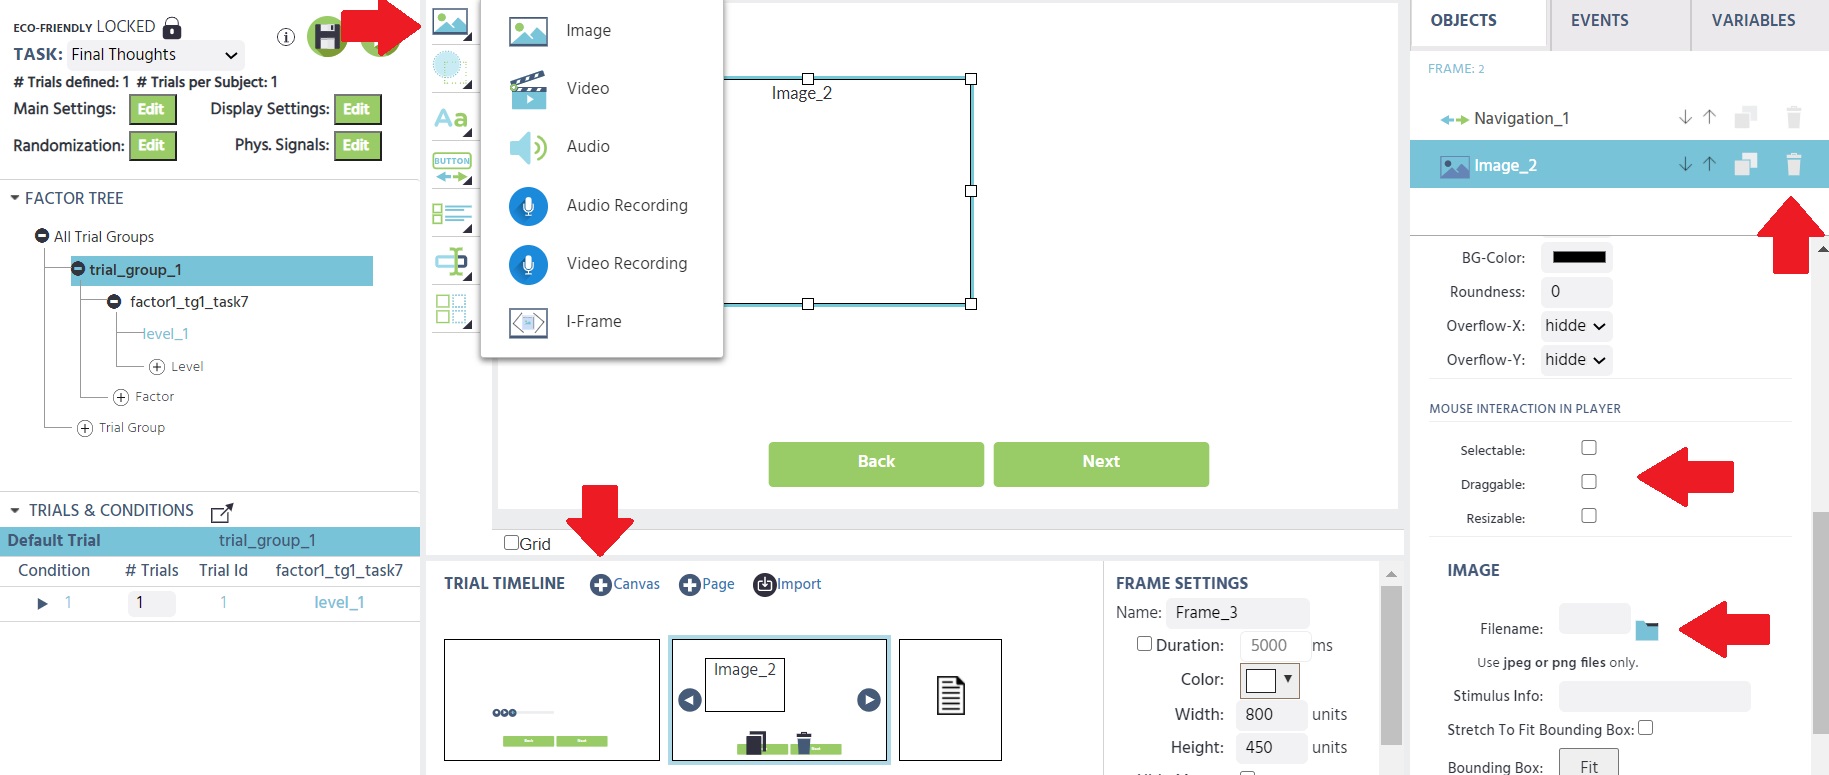
- To add an image, video, or audio the user must first be in canvas mode
- Select the picture icon and select which type of file you would like to add to the frame. A box will appear in the frame.
- Select the box, by clicking on it or in the “Objects” tab, and scroll down to Image/Video/Audio to click on the folder next to filename.
- Files can be uploaded directly from the user’s device or selected from the user’s library.
- Users have a few options to allow participants to interact with the item, such as moving the image or starting/pausing the video.
- The “Object Properties” allows the user to resize or scale the image, set the image in the frame will more precision, and delete the image.
Events and Transitions
- Each frame needs an event to move it forward or have a duration time set.
- To use a simple navigation option, which allows users to go forward and backward, select “Button” in the frame’s left side panel and “Navigation.”

- The navigation bar will appear on the bottom of the page and appear under the Objects tab.
Or
- Creating a trigger and events can be done in the Events tab. This is helpful if you would like to use a different button or allow participants to trigger an action while viewing a frame.
- Select “+ New Event” to see the edit event mode.
- You will be asked to name your event and then select the trigger type. Triggers include participants clicking their mouse or keyboard, selecting a button, physiological signals, variable, or object trigger.
- Finally, you will link an action.
**For your study to run smoothly and for data to be recorded correctly you must have an event or trigger in your frame. Studies that end without an event will not record data correctly.
Variables
There are 4 types of variables Labvanced records in your study.
- Custom Variables: variables which the researcher created
- Object Variables: variables created by a questionnaire
- Factor Variables: variables that function as factors within-trial groups
- System Variables: variables that were automatically created by Labvanced
The user can disable recording the variable if the variable is not relevant to the study. This action can be completed by opening the study and selecting “Variables” in the left navigation. Users can also disable recording by going into the individual task frames and making changes in the “Variables” tab. Select the variable you want to edit and then uncheck “Record Variable.”
*Labvanced recommends disabling the recording of variables instead of deleting variables.
Users can delete variables by going into the individual task frames and into the “Variables” tab. Under “Main Type,” the variable will have a label of used or unused. If the user wants to delete the variable, they should select the variable and select the trash bin. Only delete a variable, if you are confident that you do not need the variable.
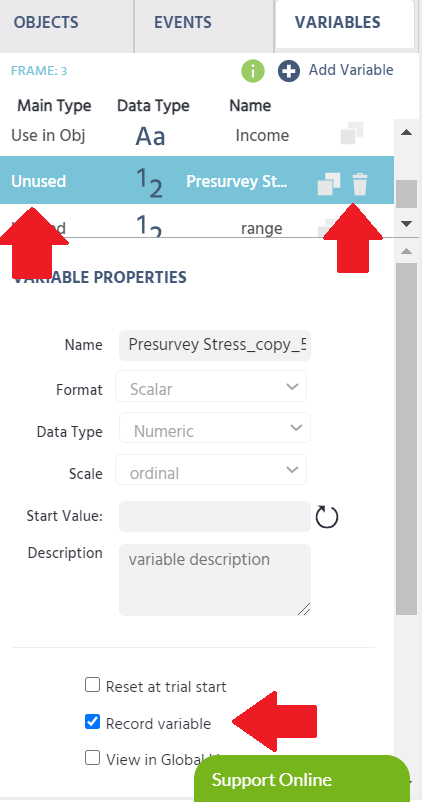
Disabling and deleting irrelevant or duplicate variables will help keep your data more organized.
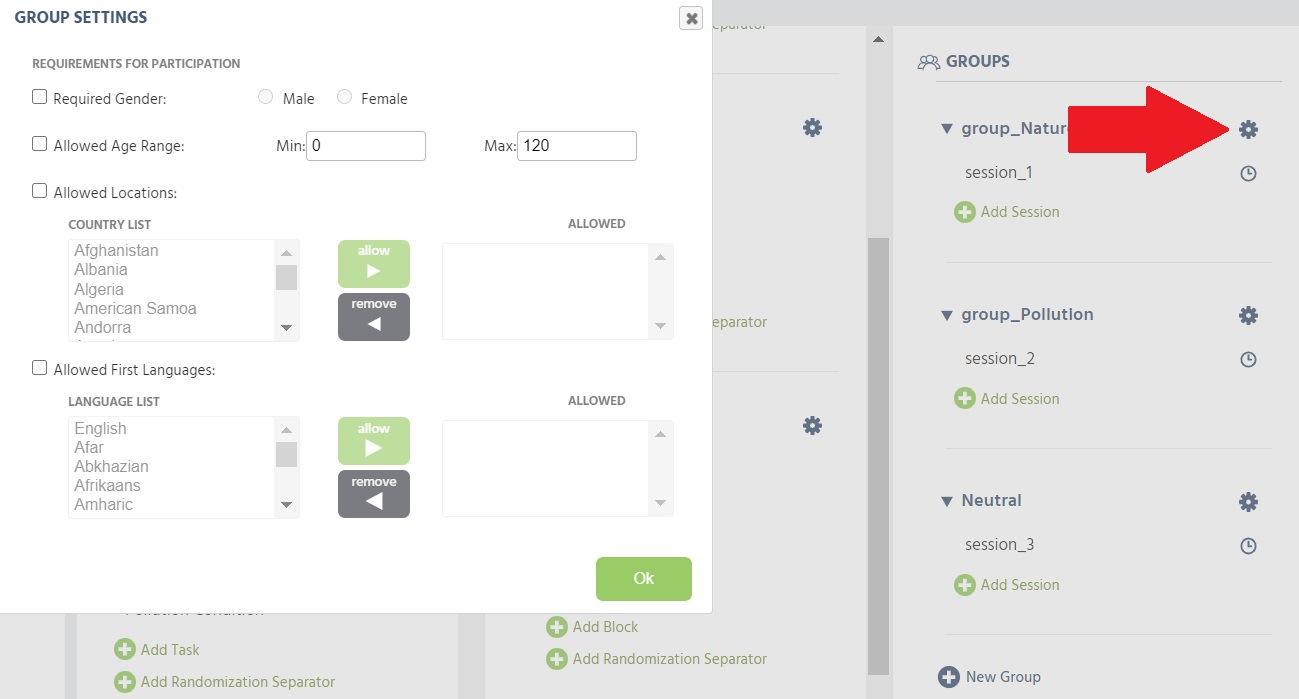
Group Settings
- Group settings can be edited in Study Design mode and by selecting the gear icon next to the group.
- The user can tailor the group settings to include certain genders, age ranges, locations, and the first language of participants.
Study Settings
- This feature can be found in the left navigation panel once a study is selected. Study settings allow users to edit general study settings and browser and device settings.
- Initial survey items that are influenced by group settings can be found under main settings. The user can ask participants about gender, age, location, first language, and e-mail.
*Initial survey items will not appear in preview mode. The items will only appear once the study has been published and participants open the study. - Experimental features can be enabled and disabled in this section, such as audio or video recording, eye tracking, and transforming the study into a multi-user study.
Preview Mode
You can preview individual tasks or the entire study with different group and session settings.
- To preview all frames in the task you would enter task editor and select the play button (next to the save icon).
- To preview the entire study, you will select the “Run” option in the left navigation. This button looks like a play button when the navigation is compressed.
- This feature allows users to enable data recording to preview the format of the collected data.
PUBLISH AND DISTRIBUTION
In order to publish your study, you must complete a description, ensure the study design matches the minimum requirements, enable recording, and check your variables.
- In the left navigation, click “Publish & Record.”
- After all requirements are met, click on the blue circle that says, “Publish & Record.”
- In the Publishing Wizard, you will select which options you would like to enable such as creating a password-protected survey, sharing the study template with others, crowdsourcing, etc.
- Read through the terms and conditions.
- Once you complete the request on the Publishing Wizard, you will see a status page. This page has the participation link, crowdsourcing link, and will allow you to create a custom participant link where you can select the group and session for the participant.
*The user can make changes to the survey after it has been published. When changes are made, Labvanced will ask the user if they would like to delete all previous participants or save changes.
DATA & REPORTS
To review data for a particular study, select the study and then click on “Dataview & Export” in the left navigation. Here users will be able to see their participants and review selected participant’s responses. To download the data in an excel format, select the participants you want included in your data collection record and choose the export format.
SHARING EXPERIMENTS
Sharing your template and data is possible with Labvanced.
- Select the study you would like to share.
- Select “Sharing” in the left navigation panel.
- Users can share their experiment’s template with all Labvanced users, by request, or not at all.
- Users can also provide access to professors and students by enabling “View Access.” The study’s method and data can be shared, however other users cannot use your study as a template, copy your study, or make any changes to it.
Importing a Study
Users can import a study by going to “My Studies” in the left navigation and selecting “Import Study.” Users can look for studies by name and can import or request the study for review.
TRAINING LINK
Labvanced offers videos and trainings to help users familiarize themselves with the program and numerous features.
Videos: https://www.labvanced.com/video_tutorials_eng.html
Directions: https://www.labvanced.com/docs/guide/
SUPPORT
Labvanced offers chat and e-mail support.
https://www.labvanced.com/contact.html
You may also contact us with questions using the inquiry and appointment forms.